Fahrenheit (Indigo Prophecy) - Review (PlayStation 2, Xbox and PC game)

Fahrenheit' was released in 2005 by Quantic Dream and was really a sort of early experimental game that would set the stage for their later games of 'Heavy Rain' and 'Beyond: Two Souls

Never Alone - Review (PC, Xbox One and PlayStation 4 game)

‘Never Alone’ is one of those games that test the traditional boundaries of what a video game should be as it really is a vehicle for telling a larger story, one of the Iñupiat people and it goes about this in such a heart-warming way that it’s difficult not to enjoy it.

Last Inua - Review (iOS and PC)

‘Last Inua’ is set in a frozen tundra and is an icy tale of a father and son’s journey to vanquish evil from the world in the form of a demon named Tonrar. The son, Hiko, is blessed with supernatural powers strong enough to defeat Tonrar but his frail, adolescent body is unable to handle these powers and as such he is too weak to embark on this quest alone.

Machinarium - Review (PC and Mobile game)

'Machinarium' is a point and click puzzle game where you take control of a small, unassuming robot in a robotic society that’s victim to a gang of antisocial thugs.

Harvest moon, A Wonderful Life, SE: Befriending villagers and receiving gifts

Friendship points can be acquired in the traditional, ‘gift-giving’ method but also by giving villagers discounts at your store. This means that if you give them three discounts a day (the maximum number) and one gift a day then you’ve acquired four friendship points.

Showing posts with label Game guide. Show all posts

Saturday, December 20, 2014

Richard and Alice - Walkthrough and Ending Guide

Richard and Alice is a point and click puzzle game that takes place in a sort of dystopian future where the world is besieged by winter and the majority of society are either dead or locked up. The game flips between the present day where our protagonists are trapped in prison cells and flashbacks where we learn more about Alice and her background.


The game has five different endings and the decisions that affect which ending you’ll see once you complete the game are not at all obvious. To help, I’ve listed the decisions supposedly required to view each ending at the bottom of the walkthrough. I recommend you play through the game once then return to view the other endings as it seems kind of weird to pick which ending you want to view before even knowing what happens in the story! 


Anyway, below you'll find a spoiler free walkthrough for all the actions required to complete the game. I try to keep things minimalistic with only the things required to do to advance without giving away any plot details, hope you enjoy it! :)

The Beginning:

Richard: 
 
Pick up the photograph from the bedside table
Use the wardrobe for a login stick
Use the login stick with the computer
Take the spare sheet and spare duvet cover from beneath the bed
Use the two sheets together then use this combination with the door
Use the photograph with the door

Alice:


After the dialogue, use the box key on the box
Talk to Barney about everything
Move the plant near the door
Examine the hole that is revealed
Pick up a block from the floor
Use the block with the exposed hole

Day 1:


Richard:

Use the shower
Submit a ticket using the computer
Talk to Alice then pick up the metal tray
Use the metal tray with Alice
Talk to Alice and ask her about what happened after the basement.


Alice:

Walk to the lower left area.
Enter the shed.
Pick up the rusty shears from above the workbench.
Use the rusty shears on the cabinet.
Pick up all the items from the cabinet.
Examine the note then leave.
Return to the house.
Use the small key on the padlock.
Use the gun on the padlock.
Pick up the note from the bulletin board and read it.
Examine the radio.
Search the cabinet to receive some shotgun shells.
Search the cupboard in the kitchen to receive sweetcorn, big bags and another note.
Read the handwritten note

Use the binbags on the rotten food.
Talk to Barney about everything and ask about the bad men.
Read the note Barney gives to you.
Open the middle door and enter the room.
Use your small key on the toy chest to receive a keepsake box.
Examine the keepsake box.
Look at the child’s drawing.
Search the clothes to get some torn paper.
Examine the torn paper.
Use the set of keys on the door to the left.
Pick up the wooden plank and use it on the front door.


Day 5


Richard:

After talking to Alice search the bucket for sticky tape
Pick up the brush and mop
Use the mop on the brush
Now use the sticky tape on the mop and brush combination
Use this makeshift pole on the Environmental control unit outside the cell
Talk to Alice again to receive a 2nd brush
Use this brush on the makeshift pole
Use the sticky tape with the pole with extra brush
Now use the longer makeshift pole on the Environmental control unit.

Alice:

Head downwards and take the satchel by the bench.
Examine the satchel for a diary
Examine the diary then the sign, tell Barney polar bears aren’t scary
Pick up the flowers then head to the upper left area around the frozen lake.
Search the grave closest to the one with the dead wreath
Use the flowers with the grave. Tell Barney his father died. 


Day 6

Richard:


After talking to Alice, use the computer and try to submit a ticket.
Talk to Alice and ask about the handbook then ask her to look up Section 64C
Try to pry open the bathroom cabinet
Search the mostly empty plate for a safety knife
Use this safety knife with the cabinet

Alice:

Walk up to the left.
Look at the can in the bin.
Take the piece of paper and read it then go left to the frozen lake.
Return to the church and head inside the wooden doors.
Read the book that’s to the right.
Examine the statue of Mary that’s at the front of the church.
Look at the trapdoor and try to open itTake the ladder then pick up the electric lighter from the altar
Head outside again and return to the house.
Inside, use the radio to get some batteries.
Put the batteries in the electric lighter.
Look inside the cooker to get a baking tray.
Leave the house and return to the church.
Use your electric lighter on the can in the bin.
Use the rust removal spray on the rusted ladder.
Return to the hosue again and use your ladder on the upper window to get inside.
Take the crowbar from uner the board.
Get the note from the lower right pole.
Pick up the empty notebook and old newspaper from the table.
Go back out through the window, pick up the ladder and go back to the church.
Go inside the church and use your crowbar on the statue of Mary.
Go outside and into the shed.
Use your baking tray on the vice.
Use your shotgun shells on the vice.
Pick up the tray of gunpowder.
Leave the shed and return to the outside of the church.

Note: Now would be a good time to save as the game has alternate endings. I will begin by detailing how to go about the regular ending then, at the end of this section, detail the steps needed to unlock one of the alternate endings.

Go inside the church thhen use the homemade bomb on the broken statue.
Use the old newspaper on the makeshift expolosive.
Finally use the electric lighter on the bomb.

Alternate ending:


After leaving the shed head to the frozen lake.
Use the extendable ladder on the frozen lake for a bullet for the gun.
That’s it, continue with the rest of the walkthrough.


Day 7

Richard:

Take the toothbrush cup from the bathroom cabinet.
Use the cup on the basin.
Use the cup filled with water on the television.
Refill the cup at the basin then use it on the computer.

Alice:

Leave the house and head to the church.
Enter the church and talk to the man at the confessional about everything.
Outside at the grave talk to Mark about everything.

Richard:


Take the brick from the ground.
Search the hanging guard for a pocket mirror.
Use the brick with the mirror to get some shards of glass.
Use the glass shards on the laser beams.
Use the keypad to complete the game.

Alternate
Ending Guide:
 
There are essentially three decisions in the game that effect the ending you receive upon completion of the game. One of those decisions is whether or not you find the bullet at the frozen lake towards the end of the game whilst the other two decisions are whether you read all of the in-game notes, letters and suchforth and whether you give the toy car to Barney as he is dying. You can see which decisions lead to which ending in the flowchart below. 


Parting ways: 


In this ending Alice digs out the gun from Barney's grave and becomes increasingly aggressive towards Richard as he tries to calm her down. Alice admits that she's not going to kill Richard but instead demands he turns around. When he does so, Alice knocks him unconscious. When Richard awakens he finds himself locked inside a shed with his family photo nearby. When Richard picks the photo up he finds that Alice has written a note on it where she apologizes but concedes that we do what we have to do in order to survive.

Justice for all: 


In this ending Alice digs out the gun from Barney's grave and becomes increasingly aggressive towards Richard as he tries to calm her down. The screen turns black as a gunshot is heard and when the screen fades back in we see that Alice is gone and that Richard has been shot dead. 

Polar Bear Territory: 

In this ending Alice continues talking to Barney's grave and finally she and Richard walk off together. They stop by the Polar Bear sign and wonder if joining the Polar Bears is the right thing to do and ponder if their chances would be better that way. They decide that it would be and the game ends with the pair leaving to try and join up with the Polar Bears.

Nothing’s Changed:


In this ending the pair talk about their experiences together and whilst Alice is angry at Richard for his actions she admits she was grateful for his company. Alice insists that Richard provides her with food and resources before they part ways. The game ends with Alice telling Richard that, "Sometimes, it seems like this is the way it always was. Like nothing's changed at all."

Hold On: 


In this ending Alice digs out the gun from Barney's grave and becomes increasingly aggressive towards Richard as he tries to calm her down. The screen turns black as a gunshot is heard and when the scene is shown again we see that Alice has committed suicide.

Saturday, November 1, 2014

Harvest Moon, A Wonderful Life: SE: Marriage, Dating and The Girls

In Harvest Moon, A Wonderful Life Special Edition there are four girls to marry; Celia, Muffy, Nami and Lumina and it’s an essential part of the game to pick one of them. If you haven’t married by the end of Year 1 then it’s game over for you. If you feel like you’re under pressure, then good, because you are. If you haven’t proposed to any of the girls by the end of the 10th day of Winter then the one who likes you the most will ask you. If you reject whomever comes to your door then you’ll leave the valley and be sent back to the main menu. There is no way out of it. 


Each girl has a diary and this is the way you check how they feel about you. Each girl starts out with one green heart, meaning they don’t like you. As you give them gifts and talk to them then that one heart will turn into a red heart, after that, it will gradually go up to a maximum of four red hearts meaning they will marry you if you ask. To gain more hearts you must continue to give them gifts, it won’t happen by itself, usually. Muffy and Celia may love you up to two hearts just for your continued existence. They can be fickle creatures though. Sometimes by proposing, then rejecting, one of the girls then it may make some of the other girls like you more. I wouldn’t advocate this approach though, you’ll just end up making people hate you and it’s not an efficient means of making a girl fall in love with you. Just like in real life.

To have a girl fall in love with you you should talk to them and give them the gifts they like. There are around five or six love cutscenes fo each girl and within these cutscenes you need to pick the right responses. You trigger cutscenes dependent on how much they girl likes you, although some can be random. You won’t actually be able to propose until you have the blue feather which you’ll be given on the first day of Summer. 


So, who are the girls, what do they like and how do you get the cutscenes? 


The Girls:


So we have four girls in this game: 


Nami: 28 years old, bright red hair, light blue eyes. She wears a pair of tan shorts and a blue vest top, she looks slightly boyish and stays at the Inner Inn. She can be found wandering all over the place. She wakes up at 9am and leaves her room at around 9:30am. Her diary is in her room on her desk.

Likes: Trick blue flowers, clay statues, fossils and curry

Muffy: 32 years old, long blonde hair, blue eyes. She wears a red dress and a red hairband. Muffy lives and works in the Blue Bar and can be found there most days. She will leave around 4pm for a quick walk to the Inner Inn before going back around 5:30pm for the evening shift. Muffy’s diary is in the flower arrangement at the back of the bar.

Likes: Flowers, moon ores,

Celia: 26 years old, long brown hair, dark brown eyes. She wears a dark green dress. Celia is a hired hand at Vesta’s farm who is also her aunt. Celia wakes up at 6am in the morning and can be found in Vesta’s house on the ground floor where she spends most of the day. Her diary can be found up the ladder in that house, beneath her bed.

Likes: Flowers, eggs, vegetables

Lumina: 18 years old, honey coloured hair tied back with a yellow hairband. Lumina wears a white top and blue trousers and has a very slight frame. Lumina lives with her grandmother, Romana, in the large Villa at the top of the hill. When she’s not playing the piano she can be found in her bedroom upstairs, outside in the garden or walking down the hill and at the base of the hill. Her diary is at the back of her room, upstairs in the mansion. 


Likes: Flowers, golden wool, strawberry cake 


Nami:


A trav
elling girl considered to be the most intelligent out of all of the girls, she’s a little quiet and very down to earth. She’s apparently hard to impress, but not really, she just likes specific things. Nami often has little observations about the world and the seasons, she prefers the winter. Nami is a law unto herself and her schedule is very unpredictable, she wanders around the place a lot and won’t be found staying at home all day. 


If you don’t marry Nami she will leave the valley at the end of chapter one. If you really like her and are sad to hear this then no worries, there’s a cutscene that means she’ll come back and resume her place in the Valley. You’ll hardly notice her missing.

If you marry Nami she’ll come live with you at the farm and will be generally disinterested in what you do. She’ll stubbornly maintain her original outfit, unlike every other bride, but will maintain a balance of being inside and outside the house. She’ll often stand in the pasture standing out with her arms held out, looking up at the sky.

Schedule: Wakes up at 9am, leaves room at 10am. She will then hang out around the back of the inn before wandering the valley. She may end up visiting the bar in the evening and will go to bed whenever she feels like it. This can range from 11pm to 2am.

Note:
If you speak to her repeatedly until she has nothing new to say, you will gain favour. I had 1 red heart, nothing to give her, spoke to her a lot in her room, checked her diary again and it had gone up to 2 hearts.

Nami cutscene 1: 

 
You'll trigger this at 1 red heart. Leave your house around 12pm to find that Nami is mooching around your farm, looking at all your stuff. You’ll automatically go and talk to her and she’ll tell you to get back to work. If you like Nami and want her to like you back, tell her she can do whatever she wants. With this new freedom Nami will stay a little longer at your farm to explore it further. She’ll then leave in good spirits.

Nami cutscene 2:

You need 2 hearts for this one, though it can trigger at 1 heart. Go into the Blue Bar at between 7pm – 8pm provided Nami is in the bar and not elsewhere. Nami will ask you what it is you want and you should ask her whether you can sit next to her. She’ll let you, the next conversation option will let you pick between talking about her or talking about yourself. Talk about her, she’ll be a little defensive but tell you some stuff. For the next option you have the choice between saying “hmmm” or nodding, you should turn and nod and Nami will go over all shy and embarrassed before escaping from the bar. You turn to leave, but it seems as though Nami has forgotten to pay her tab, as Muffy helpfully points out, you should pay for it which is 256g. Muffy will coo about how generous you are and you get to leave feeling like such a nice guy, though 256g poorer. 


Nami cutscene 3:

3 red hearts for this one. Go into your house and back out again at some time in the morning, around 8am. If you don’t get it first time, keep trying. You’ll see Tim and Ruby at your doorstop and they’ll inform you that Nami is missing and they want your help. It seems as though Nami has left her rent money and left the valley. You haven’t seen her either so you’ll have the option of helping to look for her. Agree to do this. Later on, you still haven’t found her and, dejected, you’ll all go back to the inn. Suddenly, Nami wanders in on the scene asking Ruby what’s for dinner. Everybody is ecstatic, Nami is confused, they all go to lunch. Afterwards, Nami will talk to you in private.

Nami cutscene 4: 

 
4 hearts for this one! To trigger this scene go into the inn sometime in the evening when Nami is in there. If you’re struggling to get it, try following Nami about and follow her into the Inn when she goes in. Tim will tell Nami she had a phonecall from her father, Nami isn’t best pleased and will ask if she has any mail. She’ll have a letter which will prompt her to ask Tim if she can work at the inn, he’ll agree but she’ll change her mind on the spot. Nami will then ask you if she can work at the farm; agree, but she’ll change her mind again. Apparently this girl doesn’t know what she wants. Nami will then leave.

Nami cutscene 5:


This cutscene is a kind of proposal event. During the winter go into the inn in the evening and Tim will tell you Nami is sad. At that moment, Nami will come down the stairs and leave the inn, on the verge of tears. You’ll follow her and she’ll confide in you telling you that she’s run out of money and can’t continue staying with Ruby and Tim. You can offer that she comes and lives with you instead, Nami will be over the moon and will agree to live with you instead.

Proposal: 

 
Even after you have received that last proposal event you can propose to Nami officially with the blue feather to suggest marriage. You may as well, since you’re not exactly going to be roommates but rather, you’ll be parents sharing a bed. Doing parenting things together. Propose to Nami at 4 hearts, she may or may not know what the feather is depending on how many cutscenes you have done thus far, either way she’ll accept. Congrats. You won’t marry immediately, it will happen after the 10th day of Winter. 


Lumina:


In the Special Edition version of the game you now have Lumina, previously a child in the original version of the game, available for marriage. She’s now 18 years old but the character model is the same for the first year of the game. After you marry her she will look a lot more mature so don’t worry too much about it. She lives with her rich grandmother and their butler. She starts out sweet but very restricted by her grandmother but turns rather strict by the time you have a child together. Lumina plays a lot of piano, she doesn’t really want to but she’s a very musical person and this will influence your kid later on. 


If you marry Lumina she will wear a blue dress with a pink headband during Chapter 2: A Birth and will spend a lot of time in the house, though can sometimes be found wandering around outside the farm. She will don a yellow tartan dress and orange neckscarf for any subsequent chapters.

If you don't marry Lumina she will wear a sort of yellow tartan dress with and orange neckscarf. She will continue to live at home with her grandmother and Sebastian and will never marry.

Schedule: Lumina will exit her bedroom in the upstairs area of the mansion at around 9am, go downstairs and play the piano until about midday, then leave the mansion and either spend time in the courtyard or walk down to visit the firework makers. On Van days Lumina will visit Vans store and will spend a lot more time outside around the valley.

Lumina cutscene 1:

To trigger this cutscene you need 1 red heart. Enter the Villa when Lumina is playing on the piano, between 10am and 12pm, I triggered it at almost dead on 10am. Upon entering the villa you’ll find Lumina playing on the piano with Romana and Rock watching her, you’ll join them and watch as Romana compliment Lumina’s piano playing. Romana encourages Lumina to play more creatively before leaving. As Rock hovers about in the background you’ll approach Lumina and she’ll confess that she’s not enjoying playing the piano as much as she used to, she asks you what it means to ‘play more freely’. You can either respond with ‘just work harder’ or ‘juts have more fun’. Pick ‘just have more fun’ and Rock will leave as Lumina asks if she can talk to you, privately. Lumina will tell you about how she started playing the piano when she was very young and about the pressure she feels to play perfectly and how she was constantly compared to her mother, who also played piano. Lumina became overly worried about making mistakes and disappointing Romana as she tried to live up to her mother’s memory, Lumina realizes that Romana wouldn’t want that and wants her to enjoy it. After the chat, Lumina will feel much better and thanks you for listening to her.

Lumina cutscene 2:

Triggered at 2 hearts, walk into her room whilst she is in there alone. This can be triggered either in the morning between 8am and 9am or after she has finished playing the piano after 12pm. I triggered this at 12:45pm. Upon entering the room Lumina will be thrilled to see you and tell you she was looking through an art book given to her by Romana, she’ll ask you if you want to talk, reply with ‘with pleasure’ and she’ll talk about how much she likes paintings before telling you they give her a warm feeling, you can reply with, ‘what kind of paintings are they’ or ‘are they paintings of fires?’ you can reply with either answer and she’ll go into detail about the paintings. There will be another option between asking whether she wants an older sister or somebody to play the piano with, you can pick either option for this one also and she’ll tell you that you feel like a big brother to her. I presume that this feeling changes when you eventually marry the girl. At the end of the scene she’ll thank you for the conversation and show you out of the mansion, mentioning she’ll go play with some random ‘Liz’ and ‘Tanya’ type characters who I can only assume are the cats.

Lumina cutscene 3:


3 red hearts are needed to trigger this cutscene and, oddly, it focuses on Sebastian. Enter the villa foyer after 7pm to be greeted by a surprised Sebastian. He wants to show you about a new dinner he’s been preparing and wants to hear you opinion on how it tastes. As you go to the kitchen you’ll hear Romana and Lumina talking in the next room about something that sounds suspiciously like you. Before you can hear too much, Sebastian ushers you into the kitchen and scolds you for listening at their door. In the kitchen, you’ll be presented with a dish and the option to tell Sebastian, “Delicious! Or ‘It’s… terrible!”, tell Sebastian it’s delicious and he’ll be overjoyed. He’ll explain why he’s come up with the new dish and tell you that Lumina has become beautiful recently and will hint that she’s in love with somebody. He’ll reminisce about Romana and his unrequited love, finally Sebastian will thank you and you’ll leave the kitchen.

Lumina cutscene 4:

At 4 red hearts you can access the final Lumina cutscene. Leave the mansion sometime after 7am to have Lumina stop you as you leave. She’ll invite you for a walk down to the ocean, you have the options to say ‘Sure…’ or, ‘Sorry, I’m busy…’ agree to go with her. You’ll go down to the beach together and talk, soon she’ll ask you about the first person you fell in love with. You can choose between ‘I haven’t fallen in love yet’ ‘I forget’ or ‘What about you?’ ask her about her first love by picking ‘what about you?’ and she’ll talk about a conversation between her and Romana. She’ll say she feels differently about you to other people before asking you that, if she had a big brother, would she feel the same. Reply with ‘I don’t think so’ and Lumina will realize that she’s fallen in love with you. At this point, 
Sebastian interrupts and Lumina will leave with a final invite for you to visit her at the mansion.

Proposal:


Celia: 

 
You’ve probably already met her; she lives at the neighbouring farm and is shy and childish. She talks to plants, which is a little odd, but sweet. She often comments on the surrounding nature of the valley and has a very appreciative, carefree attitude. Vesta often speaks for her but Celia does raise her voice against Marlin when necessary, so she’s not a complete pushover. Celia is often the obvious choice for a farmer’s wife because she knows everything there is about crops and trees. Don’t expect this to give you an advantage however because she won’t help with your farm, like all of the wives. She currently lives with her aunt, Vesta and Vesta’s younger brother, Marlin. There’s an odd thing going on here because Marlin and Celia are some kind of unofficial couple; so yeah, make of that what you will. 


If you don’t marry Celia she will continue to live with Vesta and Marlin and not much seems to come of Marlin’s infatuation with her. Celia gets a little stricter and sterner with him though. There’s a cutscene with Marlin concerning this change in her.

If you marry Celia she’ll adopt a red dress instead of the green one and will mostly stay inside the house. She will want your child to take over the farm. Celia will continue to wake up at 6am; the earliest of all the brides.

Schedule: Wakes up at 6am, leaves house at 9am. Sometimes Celia will walk to the shops, across the bridge, and on Van days she can often be found near Vans store or near the pond by the Harvest Sprites house.

Celia cutscene 1:

Celia’s first cutscene is a little odd. To trigger it you’ll need 1 or 2 red hearts and you should go into the house at Vesta’s farm then go back out again whilst Celia is outside. Celia will be out tending to the crops and you’ll walk over to her. She’ll tell you how much she loves working on the farm and ask you if you feel the time, tell her you do. Celia will then disclose that she thinks working in the field gives her extra strength, then she’ll laugh and ask if you if that sounds childish. You don’t have the chance to tell her it’s a little unusual because your character will automatically shake his head no.

Celia cutscene 2:

This cutscene can happen at any time between 2 to 4 hearts. When you leave your house sometime in the evening you’ll see Celia walking up to the Spring, she’ll call out and ask how everybody’s doing then continue on her way. You’ll automatically follow her and Celia invites you to spend some time with her, asking you not to move so as not to disturb the surrounding nature. You don’t want to annoy her so don’t move and wait for a minute. Celia will then ask you if you feel better now that you’ve relaxed a little. You should say that you do feel a little better and she’ll be pleased but go home anyway, leaving you standing there.

Celia cutscene 3:

Again, this cutscene can happen with either 2 or 3 hearts in the diary. Generally it seems as though Celia’s cutscenes are almost random. You can trigger this scene by trying to enter Vesta’s house when Celia is inside. Around about 10am works for me. Celia will exit the house before you have the chance to enter and will be startled to see you standing there. She’ll walk off and you’ll automatically follow her. Your first option is between ‘yep’ and asking her if she’s free right now. Ask her that and Marlin will come out the house and spy on your conversation. He’ll interrupt your plans for a date and will be rather unexpectedly angry.

Marlin will remind Celia that she’s supposed to be shopping today and Celia will apologize for forgetting. You should offer to go with her and Celia will be happy to hear that, Marlin will interrupt again saying you can’t go and imply that you’re a womanizing jerk. Celia will be, naturally, rather furious with him. At this point Vesta will come and join the party. Vesta will also want to know why Celia isn’t shopping and Marlin decides now is a good time to lay the blame on you. You can blame Marlin or apologize; apologize for delaying Celia and Celia will defend you then ask you to escort her partway to town. You do so, and she’ll apologize for Marlin’s behaviour and overall rudeness.

Celia cutscene 4:

3 hearts needed. Try to enter the house (not the produce room) in the morning when only Celia is inside. This worked for me at 8am just after Marlin had left and Vesta was already outside. Before you can enter Celia will leave the house and invite you to go with her on a walk. You can choose to go or not go, go with her and she’ll be super pleased. You’ll both go to the spring where Celia will appreciate nature for a bit before turning away, sad, you can tell her to cheer up or to confide in you. Ask her what’s wrong. Celia will reveal that Vesta wants her to have an arranged marriage but Celia doesn’t want to; she wants to marry for love. You can tell her to refuse the marriage or to try it out. You can actually pick either option; it doesn’t seem to make much difference.

Celia cutscene 5:

To trigger this one you need 4 red hearts in the diary and you must enter the house at the produce farm when Vesta, Marlin and Celia are all downstairs. This might be tricky to do but it triggered for me around 11:30am. Once you’ve got the event you’ll see Marlin shouting at Celia for meeting with the guy she’s supposed to be marrying without telling him. Vesta tells Marlin off, since it’s none of his business, and Marlin will continue demanding things of Celia. He wants to know whether she will marry him or not. Before Celia has a chance to answer, Vesta will answer for her; once again telling Marlin it’s none of his damn business. When they finally realize that you’re in the room you should pretend that you didn’t hear anything. Marlin will continue acting like a jerk and Vesta will explain what’s going on. Celia will hint that she likes you more than the man she is ‘engaged’ to.

Celia cutscene 6

At 4 hearts you should exit your house to trigger the event. This seems to come at any time as I’ve read people getting it in the evening whereas I got it on the 1st day of Fall at 6:30am. You’ll see Takakura and Vesta at the door. They’re extremely worried because Celia cannot be found, Marlin will show up and say he can’t find her either. Vesta will look really down and depressed whilst you go to the spring, her favourite spot, to look for her but she’s not there either. You’ll spin around some, looking sad and eventually shake your head before returning home. Upon turning the corner you’ll see Celia standing there, talking to your dog. She’ll turn and see you standing on the other side of the field, you smile at each other then you go over. You’ll talk to her and find out she turned down all the previous arranged marriages. She’ll then quite bluntly confess her love for you. If you say that you love her too then it’s essentially an unofficial proposal. You can still propose with the blue feather afterwards though, if you’d like. You can also say “I’m sorry…” if you want to reject her.

Proposal cut scene: Offer Celia the blue feather when you have four hearts. Celia will tell you that her Mum got a blue feather from her Dad and that she doesn’t know anyone else who’s ever got one. She’ll tell you how happy she is and agree to marry you. 


Muffy


She’s the eldest out of the four girls and wants a serious, committed relationship due to having a lot of bad experiences in the past. She works at the bar with Griffin, their relationship is strictly surrogate father-daughter. She’s often considered to be easy or ‘loose’ but it seems a little unfair as she’s about as easy to wed as any of the girls, if not harder than Celia. Muffy is flirty, very girly and bubbly and doesn’t know much about farming or animals. She used to live and work in the city and is struggling to adapt to the slow country life of the Valley. 


If you marry her she’ll place an emphasis on how she wants her child to be intelligent, change her outfit into a blue one and in later chapters will continue to work at the bar. Despite her original reservations, once married, you’ll often find her walking about your farm and exploring the rooms and field. Muffy will sleep in later than the other brides; until 9am.

If you don’t marry her you’ll watch her live out her life lonely and alone, slowly going grey whilst staring out at the ocean. She will often confide in you about how she was cheated on/dumped etc and in the final chapter of the game, when she's grey, she'll reflect on how she wished she'd married and had children like you did. But don’t let that influence your decision.

Muffy cutscene 1:

Exit out of your house sometime after midday but before 5pm. Takakura will come up to talk to you about shipping items but will be interrupted by your dog barking at something, or someone. Turns out, Muffy has just met your dog. She’ll be backed up against the barn and you’ll run over to help her. After you explain to her why the dog was getting so defensive she’ll freak out a little, Takakura will look kind of irritated and unimpressed, and Muffy will begin to feel self-conscious. She’ll apologize for interrupting your discussion and you can tell her not to worry about it or that Takakura’s always angry. Tell her not to worry about it then ask her if she’s hurt. She’ll make some flimsy excuse as to why she’s come along then ask if next time you can show her around the farm, you’ll automatically agree. She’ll then leave with a “bye bye”.

Muffy cutscene 2:

Try and enter the bar sometime in the evening whilst Muffy is working inside, I trigged the event just before 8pm. Before you get a chance to enter Muffy will exit and be surprised to see you, she’ll then confess that she broke some plates that day. She’ll condemn herself for being a clutz then hint that she’s thinking about something important; you’ll get the choice to go inside with her or talk to her out here. Talk to her and she’ll feel better but go inside with you anyway without actually talking.

Muffy cutscene 3: 


After Muffy has 3 red hearts, or more, exit your house after midday, around 2/3pm. It can be triggered surprisingly late; I triggered it after 8pm when it was dark. You will see Muffy standing on the bridge, looking rather depressed. When you go over to her to see what's wrong she'll explain that she went to a friend's wedding recently but that it wasn't very fun as everybody wanted to know what she was up to these days. When Muffy told them she was a barmaid in Forget-Me-Not valley they found it funny, despite living in the city for so long she no longer feels like she belongs there. Muffy is upset because she feels like she doesn't  belong here in the valley either. When she asks for your opinion, tell her you think she does belong here and this will cheer her up as she vows he'll stay here until she's an old woman and get married and be happy.

Muffy cutscene 4:

To trigger this cutscene try to go to bed between 6pm and 8pm, after achieving 4 hearts, rather than the usual sleeping scene y
ou'll be interrupted by a knock at the door. Upon answering it you'll find a very frightened Muffy and Takakura, who's not so frightened, Muffy will explain to you that she's being stalked by somebody. As she's so frightened she asks if she may stay the night at your house, agree to this and she'll join you inside your house. Inside you'll talk for a short while before there's another knock at the door which turns out to be Carter, Griffin and Kassey. They'll explain that the whole situation is one big misunderstanding and that it was actually Griffin who was following Muffy and not an actual stalker, once everything's calmed down Muffy goes back to the Blue Bar for the night, somewhat irritated at Griffin for scaring her.

Muffy cutscene 5:

This cutscene is also only available at 4 red hearts and is optional. Enter the Blue Bar between the hours of 12pm and 1pm, once inside Muffy will invite you to go into the back room of the bar with her. Go with her and Muffy will explain that she's been having a bad day today and doesn't really feel like working the rest of the day. You can choose between telling her you're going back into the bar or inviting her on a date; invite her out and she'll be thrilled. You'll go out for a date together and, upon returning, Muffy will thank you for taking her out and tell you that she had a lot of fun and hopes you'll invite her out again soon. 

Proposal: 

Depending on whether you've seen the date cutscene or not you will get a slightly different proposal scene. If you did then Muffy will not ask any questions upon being given the blue feather as she already knows how much you like her whereas if you did not take her out on the date she will ask you if the blue feather is for her. After telling Muffy that the feather is for her she will, presuming she accepted your proposal, take you to the back room of the bar for some privacy. Once there she will tell you how happy she is that you proposed even though she doesn't understand why you would want to be with her, despite this, she's incredibly glad about it. After you leave Muffy will look to the blue feather with intense joy, unable to believe that she's getting married. If any of the girls have confidence issues, it certainly seems to be Muffy. 

Sunday, August 31, 2014

Only If - Black Pawn Walkthrough

'Only If' is a free game on Steam that has two paths of storyline through one very surreal game. The beginning of the game is the same for each path but changes depending on whether you pick a white pawn or a black pawn from a chess set early on in the game. This walkthrough covers the beginning of the game and the Black Pawn path, if you want to read about the White Pawn path then check out the walkthrough here. I've used a few images to help explain things and to read them I suggest you click to enlarge the image, otherwise you'll have to do some major squinting. I hope you enjoy this... unusual game.

Intro


After waking up, go out the door.
Walk up to the blue glowing orb.
Run forward, you'll notice the blue light shows up edges of walls, run around them.

Study:


After going through the door, listen to the radio and do as he says.
Go look in the mirror in the small area through the archway.
Remove the mirror with E.
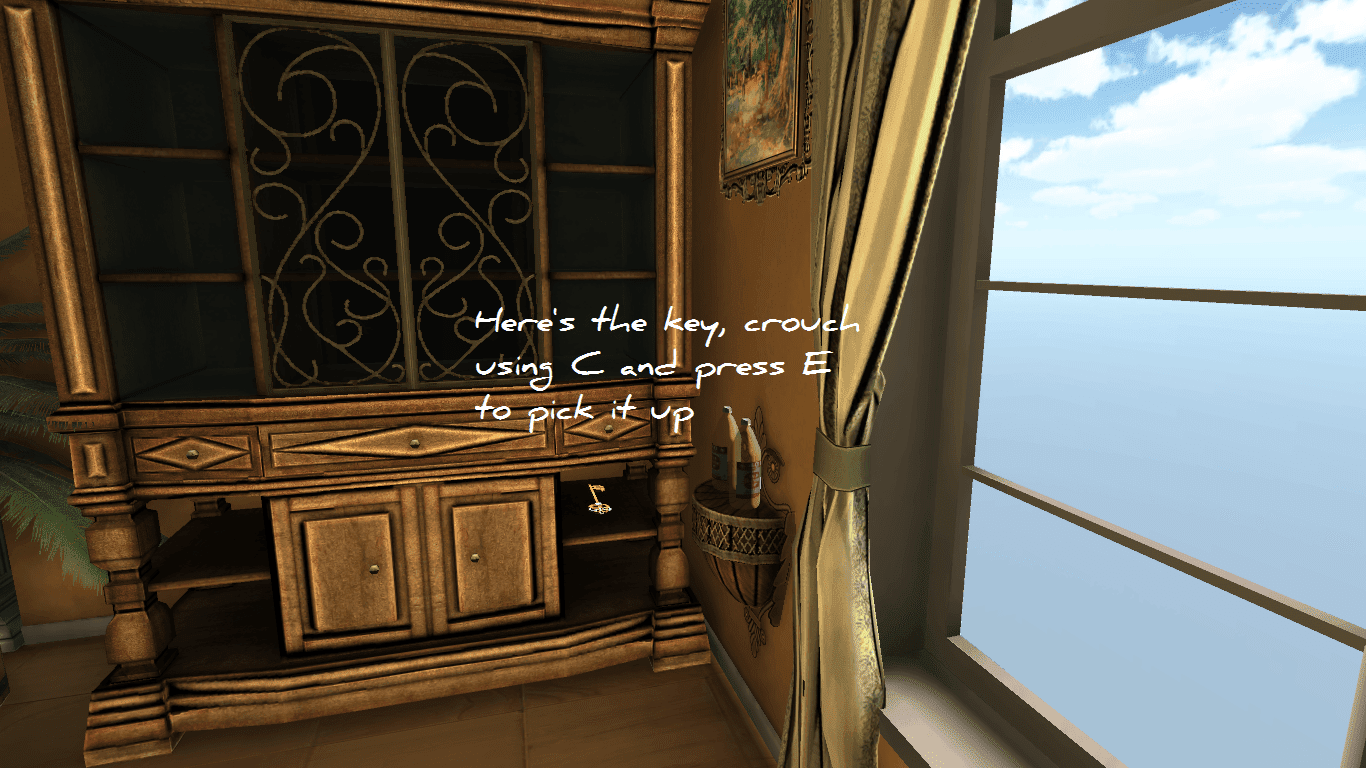
Find the key in the time limit, it's by the window on the lower shelf of the cabinet.

Only if pc game walkthrough location of key

Use the key to open the door where the mirror just was.
Choose your chess board piece.  
Pick up the four still life paintings and put them all in the fireplace.
Pull the fireplace's level to burn them.
Now go through the door after picking up the key.


Black pawn level names


1. Windmill
2. House
3. Basement
4. Basementpart2

Windmill:


As you regain control, turn around and examine the chess board.
Manically tap the spacebar until you break the surface of the water
After the dialogue, tap E when you are prompted to
Once you have crawled to the clearing, keep following the stone path along until the screen fades
Now you’re standing, follow the path to the top left hand clearing.
When you see the blackness, quickly turn around and follow the newly opened pathway.
Don’t go near the blackness and press E when prompted to
From here just keep following the path along to the best of your ability to tap E when needed until entering the next area.

House:


Leave the room and make a U-Turn into another room with a jug on a table and a message near it
Drink the water then backtrack and turn right, entering the newly opened door.
Here there are several exits but you should first descend the stairs twice to enter a room with iron gratings on the floor.
From here, go left and head over to the light. Pick up the safe picks.
Go back and then through the other door to where a lever is.
Activate it multiple times for an achievement then leave.
Ascend two flights of stairs into a room with a record player.
Stop the music and take the piece of paper.
Carefully descend down the stairs but make sure you run forward, not to the right.

only if pc game walkthrough black pawn path oh god vinnie's coming

Immediately upon entering the room check to the right for a flight of stairs partially hidden behind a room divider.
Here, you should be safe from your pursuers. 
Jump over the two trunks to the left and look to your immediate left for a waste paper basket.
Search inside it and pick up the pink gem inside, by holding the right mouse button you can now zoom in.
Turn, and locate a pair of wardrobes that lean together to form a V shape.
Head over to this and crouch through the gap. 
Walk around the room dividers and through the open door, following the passage.
Ignore the gated doorway and head down the next corridor until you come across a room with a safe in it.
Middle click to bring up the piece of paper and right click to zoom in on the numbers.
You need to adjust the dial to the configuration on the paper. 

only if pc game walkthrough black pawn path safe explanation

Start by turning the dial CW to 20, left click to confirm.
Now turn it CW 60, left click to confirm again.
Finally turn the dial CCW to 0 and left click.

Once the safe is open, backtrack to the gate and go through it.
Once in the hallway start sprinting as you'll be chased again.
Run through the corridor, avoiding the wooden pillars, until you go through into the next area. 


Basement:


Once the chase is over, go through the hole beneath you.
Walk through the hallway, ignoring the room on the left with the lever in it, and head into the room at the end of the hall.
After being shown how to throw boxes, remove all the boxes from the doorway ahead of you.
In the next room you'll see a short door on the left, stack boxes so you can climb over this into the next room to gain a flashlight.

only if pc game walkthrough black pawn path flashlight location

Turn around then squeeze through the gaps in the boxes until you come across a blue gem on top of the boxes in the corner.


only if pc game walkthrough black pawn path blue gem location

Once you've got the gem, backtrack to where you came in and climb back over the door.
Enter the room on your immediate left where there's a gate and lever. 
Locate the cupboard that's sitting in the smaller room to the side, you'll need to use it in a moment.
Head back to the lever and use it, the music will change as Vinnie and co. show up so quickly run back to that cupboard and hide in it. 
Listen to the ensuing conversation and once they've left the music has stopped, exit the cupboard.
On the table in front of you there's a lever that Vinnie left behind, pick it up.
Go back to the gate that you opened a moment ago and head on up the stairs, turning at the top and going up the next flight of stairs.
Once on the top floor you'll notice a gate that needs to be opened with the lever you have, put the lever in the slot and open the gate.
In the next room you'll find two locked gates on opposite sides of the room. 
Pull the lever on the right side then go back down the stairs to the lit gateway.

There's a lever on the opposite side of this gate from the one you pulled to open it, you'll need to do this very quickly so it may take a couple of attempts. Face up the stairs, with your back to the lever, you'll still be able to pull it. Pull it to open the left gate up the stairs then sprint as fast as you can, back up the stairs, and through the left gate. You may need to jump to get over the gate as it slowly lifts out of the floorboards.

In this new room you need to find a handle for the lever, go into the small room with the large cogs in it.
Pull the lever in this room to find yourself back somewhere familiar.
Return to where the two gates are, don't worry you don't have to go through the left gate again, and now you'll see that the gate on the right has opened and is lit up.
Enter this room and pick up the pink gem.
Now that you have both gems you need to backtrack all the way down to the starting hallway where you chose to ignore the room on the left (now right) and decided to go straight ahead instead. That's the room on the 2nd line of this section.
Pull the lever in this room and turn around to notice that the doorway has closed and a wooden panel with cogs has taken its place.
Put your gems into the mechanism and turn around again.
Pick up the purple gem, pull the lever and leave the room.
Turn left into the doorway and take note of the lit up door that's actually a giant cog.
Pull the lever beside this door once, then once again after it smashed the box.
Crawl under the cog into the next section.

Basementpart2:


Here you'll notice a pronged lever on top of a note in the left alcove of the room.
Pick it up then activate the other lever to open up the panel.
You'll need to go back to the top floor with the huge cogs in it and go through the timed gate again.
Once in the console room again, put the lever in the broken mechanism directly to your left.

only if pc game walkthrough black pawn path

Check out the screenshot for where you're headed, it's the gate around the corner at the end of the room.
If you're not quick enough you may die and lose your flashlight, so be careful.
Pull the lever 5 times and run through the gate and follow the cog along.
The cog will move past a hole in the tunnel, crouch down and go through this hole.
There are three doors here, one is a gate up a set of stairs, there's a panel at the base of the stairs with a cog in it. 
Put the purple gem in the cog and run through the gate.
Keep running through all the open doors, the nausea will make this quite difficult.

After the events you'll be treated to a pretty irritated Vinnie, once you've exchanged pleasantries head on back into the parlor and choose the White Pawn path, presuming you haven't already. Check out the White Pawn path guide here and a workaround if you experience the 'Black Pawn path' repeating bug.

Friday, August 29, 2014

Only If - White Pawn Walkthrough

'Only If' is a free game on Steam that has two paths of storyline through one very surreal game. The beginning of the game is the same for each path but changes depending on whether you pick a white pawn or a black pawn from a chess set early on in the game. This walkthrough covers the beginning of the game and the White Pawn path, if you want to read about the Black Pawn path then check out the walkthrough here. I've used a few images to help explain things and to read them I suggest you click to enlarge the image, otherwise you'll have to do some major squinting. I hope you enjoy this... unusual game.

Intro


After waking up, go out the door.
Walk up to the blue glowing orb.
Run forward, you'll notice the blue light shows up edges of walls, run around them.

Study:


After going through the door, listen to the radio and do as he says.
Go look in the mirror in the small area through the archway.
Remove the mirror with E.
Find the key in the time limit, it's by the window on the lower shelf of the cabinet.

Only if pc game walkthrough location of key

Use the key to open the door where the mirror just was.
Choose your chess board piece.  
Pick up the four still life paintings and put them all in the fireplace.
Pull the fireplace's level to burn them.
Now go through the door after picking up the key.

White Pawn Walkthrough


To access a level from the main menu you have to type in the level name as a form of saving and loading. Below are the level names for all stages of the white pawn playthrough. If your game has bugged after playing the Black Pawn version, which is common, type in 'whitepawn' to play the white pawn path from the very beginning.

White pawn level names:

1. Whitepawn
2. Topsyturvy
3. Park
4. Blind
5. Immensity
6. Ending
7. Whatithinkofyou

Whitepawn:

 
Walk over to the sofa and turn on the radio.
Note the painting in the small room to the right.
When Vinnie starts to count down from 5, type in ‘honey’ before he finishes.
Go through the white door behind you.

Topsyturvy:

 
In the next room, listen to the dialogue.
Around the outside of the room, note the paintings with words on, you may have to check a few times before they change to words.
In the center of the room on the table, liquid will appear in the yellow bowl. Drink it.
Go to the outside of the room and stay by the walls.
After the dialogue, go into the darkness.

Park: 

  
Only If pc game walkthrough park white pawn

 
Walk around the park until you find a black clock on a bench, situated down a path opposite the circle of red and pink flowers.
Type ‘yes’ whenever you’re asked a question.
When asked to find a blue flower, go back to the circle of red and pink flowers flowers where there’s three single blue flowers in the middle. Enter the ring of flowers.
Type ‘here’ when asked a question.
Type ‘admired’ or ‘cast’ and the area will change depending on what you pick.

You now need to find a total of 9 bins in the area, usually they are situated between benches but one is found on the edge of the map near a wall and a couple are on the corners of paths. The one against the wall is located in front of the brick maze, behind a large hill. To look in the bins press E when standing directly face on to them.

When you have found all of the bins it will zoom in on a picture of a sun hanging from a tree branch.
Locate this picture and stand beneath it, press E to activate it.
Look to the ground to locate the stepping stones. 
Follow the stones along carefully before coming to the entrance of the maze.
Enter the maze and look in the bin that's just around the corner.
Sit in the chair for a moment and appreciate nature.
Get up and try and find your way out of the maze.
When you get to a bin, look inside of it.
When there’s nowhere left to go, walk through the wall.
Crouch under the next wall up ahead then enter the darkness.

Blind:

 
Listen to Vinnie in the darkness.
Run forward through the blue light until you reach the object at the end.
Listen to Vinnie some more then turn around and go to the door directly ahead of you. It's quite hard to spot.
Open this white door and pick up the light inside.
Go back out the door and use the light, follow the direction of the post it note on the door frame
Open this next door then carefully ascend the white spiral staircase.
At the top, jump across the paintings and books to get to the rug and furniture
Pick up the light from here as well then leave this ‘room’.
Find the note on the floor in one of the open door frames. 


Only If pc game walkthrough location of door in blind level

Facing the note so that it reads the right way up, run forward and count to 6, not too fast. Turn left. If there’s no obvious door, try again but count slower.
Open the new door and crouch down to go into the fireplace.
Follow the set path and ignore the door for now.
When you find the table, read the notes and pick up the white pawns and the key.
Take the white pawns back to the fireplace and use the lever.
Crouch, and quietly advance to the door, unlocking it.
Keep crouched down and follow the set path until you reach the desk, stand up and grab the coin.
Run back to the slot machine and use it to get Anthony’s voice back.
Your screen will fade so just listen to the dialogue before the next area comes up.

Immensity:


only if walkthrough pc game immensity starting point


The basic premise here is that you need to jump; between the platforms and shoot the green vases but the jumping must be done in a specific way. For every jump, you should sprint by holding ‘shift’ and jump by holding down the spacebar. The longer you hold the spacebar the greater your jump will be so make sure you’re holding it for as long as possible. 


only if walkthrough location of pots in immensity level
 
Jump from pillar to pillar, shooting the green pots as you come across them, for every pot you shoot a glowing blue aura will be left behind and you should pick this up. For each of these you collect you’ll be able to jump a bit farther and a bit higher so make sure to search the area thoroughly and collect all of the green pots. There are approximately fourteen vases that you need to grab before reaching the top pillar and heading into the shower of pink crystals.

After the scene, shoot the large green vase and absorb the aura it drops.
Don't attempt to make the huge jump ahead of you, instead look down and to your left.
Drop down onto this lower ledge and skirt around the edge of it.
The vases are now a lot larger and should be very apparent, there’s one ahead of you on the higher up ledge.
Once you have collected all of the huge green pots carefully jump across the large grey pillars in the middle of the section that lead up to the next shower of crystals.

Ending:

 
Listen to the radio
Open the door and leave the room.
Use the mirror

Whatithinkofyou:


After the dialogue you’ll drop into a map full of green vases and four huge grandfather clocks at the four cardinal points of the area.
Walk all the way forward and search the tiny bin at the foot of the grandfather clock.
Pick up the key that appears.
Turn around and run directly forward until you reach a knocked over vase.
Shoot it point blank then go through the door.
Watch the ending scene and dialogue.

Wednesday, August 20, 2014

The Stanley Parable - Achievement Guide

Whilst the achievements to The Stanley Parable are mostly just poking fun at traditional gaming with its original brand of satire there's still those of us who can't resist unlocking them anyway. A lot of these achievements are not quite what they seem and some may come across as pointless, because they are. Regardless, here's how to unlock all of the achievements in this game, including the 'unachieveable' one which has us all resorting to being dirty rotten cheaters and editing the config file. Oh the shame. On a related note, for more Stanley stuff you can check out my Easter Egg and Endings guide here.


NameDescription
AchievementThis is an achievement
Beat the GameComplete the Stanley Parable
You can't jumpNo seriously, we disabled it.
Welcome back!Quit the game and then start it again
Click on door 430 5 timesClick on door 430 5 times
888888888888888888888888888888888888888888
Go outsideDon't play the game for 5 years
Speed RunComplete the Stanley Parable in under 4 minutes and 22 seconds (not including loading times)
CommitmentPlay the game for the entire duration of a Tuesday.
UnachieveableIt is impossible to get this achievement.

Unlocking the achievements:


Achievement:

Go into the Extras menu and enable achievements.

Beat the game:

Follow the story as the narrator describes it and complete the Freedom ending.

You can't jump:


Attempt to jump by pressing the spacebar several times.

Welcome back!
 

As described, quit the game then re-enter it.

Click on door 430 5 times:

Locate door 430, it's in the main office just outside Stanley's door, and click it. Follow the instructions of the narrator who'll guide you through the achievement.

8888888888888:

Go upstairs to the Boss's office and input the code 8888 into the keypad at the back of the room twice.

Go outside:

Don't play The Stanley Parable for 5 years or, if you haven't got 5 years to spare, set your computer clock forward 5 years with the game closed. Open the game to grab the achievement, then set your clock back to its actual date.
 

Speed run: You need to complete the game in under 4 minutes 22 seconds, minus loading times. You need to reach the Freedom Ending by following the narrator's story. This is best done afer you have completed the game several times as, by this point, the narrator will automatically open the door in the Boss's office and you don't have to use the keypad. By reseting the game several timse there is also a chance of obtaining a very short corridor leading straight to the choice between the two doors which cuts out a lot of running around at the start of the game.

Commitment:

Play the game for the entire duration of a Tuesday. This can also be achieved by fiddling with your computer clock. Open up the game, set your clock to the start of a Tuesday then forward it to the very end of a Tuesday, just before midnight and let it tick over into 'Wednesday'.

Unachieveable:

This is technically achieveable by some unknown combination of quicksaving and quickloading, or its just random, the developers made it purposefully difficult to obtain. Due to the dishonest nature of the internet you can unlock this by following these instructions:

  • Make sure the game is closed down.
  • Edit the config file which is located in your Steam folder. For example: C:\Steam\SteamApps\common\The Stanley Parable\thestanleyparable\cfg\config.cfg. You should open it with any text editor like Notepad.
  • Add this additional line to the file in a new row: bind “x” “~;_u”
  • Save the notepad file then right-click it and open properties.
  • Check the attribute “Read-only” and save this change.
  • Open up The Stanley Parable.
  • Press the “x” key which we bound earlier.
  • Wait for a moment then the achievement should unlock
Well that's about it, happy gaming, fellow completionists! Be sure to check out the rest of my crap if you enjoyed this guide.